

Assistive Listening System
Enable Live Captions Step-by-Step:
Overview
The ListenWiFi Assistive Listening System allows patrons who are hard of hearing to better experience events in the Harris Theater. We can supply a physical listening device, or patrons can use their smartphone (either iOS or Android) using the free ListenWiFi app to connect to the system. Download the pdf for the instructions here, or use the information on this page to install.
The physical listening devices we have available provide audio reinforcement to headphones or neck loops.
Using the ListenWiFi app, iOS and Android devices can provide live audio to your preferred headphones, neck loop, or hearing aids. This method is also capable of utilizing your device to provide a live captioning service.
See any Wilson Center usher or the house manager for more information or to obtain one of our physical listening devices.
Step by Step Instructions for Smartphone Use
There are 4 main steps to get your smartphone to generate real time audio and live captions in the Harris Theater:
Download and install the ListenWiFi app
Connect to the “AssistiveListening” WiFi while at the Wilson Center
Start the ListenWiFi app and select the appropriate channel to hear live audio
(Optional): Configure your iOS or Android device to provide live captions
Step One: Download and install the ListenWiFi app

Download the ListenWifi for your Apple or Android device.
Use this QR Code to download the app on an Apple or Android device
ListenWiFi recommends using wired headphones or neck loops to avoid audio delay from Bluetooth® wireless technology enabled products.
ListenWiFi can only provide audio when connected to a venue’s WiFi broadcasting live audio. In other words, you must be at the Wilson Center for it to work.
Step Two: When at the Wilson Center, connect to the WiFi named “AssistiveListening”
When you arrive at the Harris Theater inside the Wilson Center, connect to the WiFi named “AssistiveListening”
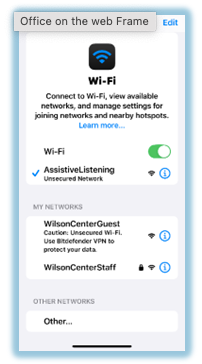
On iOS:
Go to Settings > Wi-Fi
Select the “AssistiveListening” network: AssistiveListening

On Android:
Go to Settings > Network & internet > Internet
Select the “AssistiveListening” network: AssistiveListening.
Step Three: Run ListenWiFi
Start the ListenWiFi app - and select a channel to listen to.
There are two channels available:
“Isolated Vocal” provides audio from one or more microphones on stage that are used by performers for speaking or singing. No instruments are fed to this channel, so music will not sound good (if heard at all) but voices will be very clear. This channel should be selected when using live captioning.
“Theater Audio” provides theater audio from a microphone above the audience, so it’s an exact duplicate of the material being presented on stage.
After selecting a channel, adjust volume as needed. For live captioning the volume can be all the way down, and live captioning will still work.
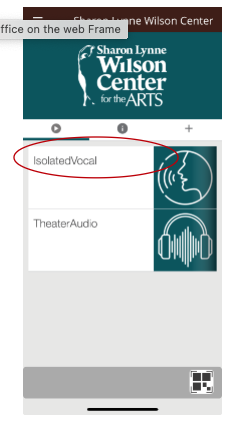
Choose the channel
Step Four: If desired, activate live captioning
Live captioning works best on the “IsolatedVocal” channel.
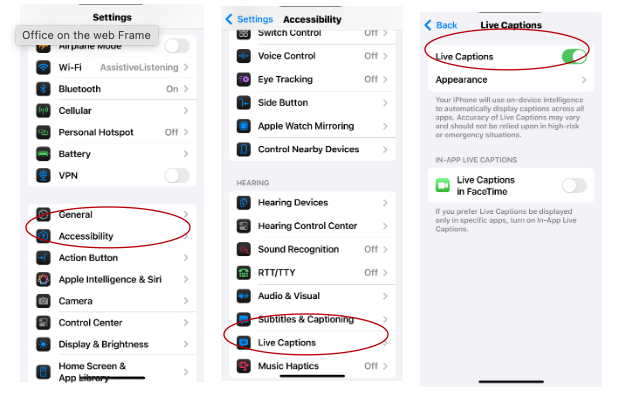
Turning on Live Captioning on iOS: Live Captioning for iOS is set through the Settings menu. Live Captions is available in English (U.S. and Canada) on iPhone 11 and later. The device must also be on iOS 16 or later.
Go to Settings > Accessibility > Live Captions (see graphic)
Turn on Live Captions, then tap Appearance to customize the text, size, and color of the captions.
When captions are on you can switch the text between full screen and a single line.
Turning on live Captioning on Android:
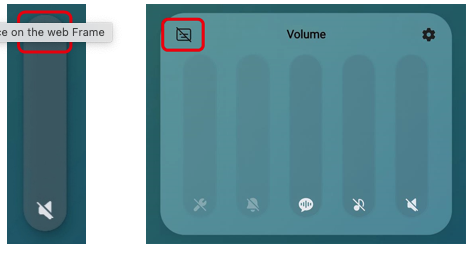
Activate Live Captioning Via the Volume Key
Activating Live Captioning Via the Volume Key
Some Android devices have the option to have their audio captioned via Google’s Live Caption function. The function is a part of Android’s accessibility settings.
The quickest way to enable Live Caption is via the shortcut under the volume controls. Tap the external audio control (volume up or down button). When the volume indicator appears, click the ellipsis menu (three dots) to access the volume controls. The Live Page 6 of 7 Updated 11/2025
Caption button should appear near the top left and can be toggled on or off. The exact placement of the Live Caption button may vary between different Android phones.
An example of where to find the caption button is highlighted in red. (see graphic)
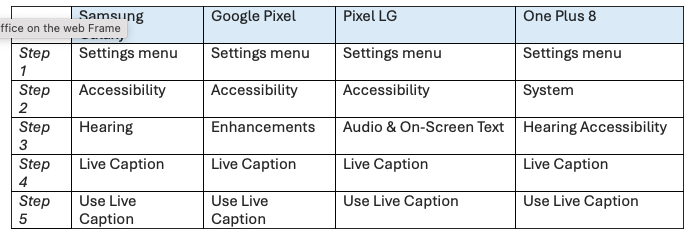
Live Captioning Via theSettings Menu
Activating Live Captioning Via the Settings Menu
Live Captioning can also be enabled through the settings menu. Please note that different Android devices have different menu layouts. This is only a guide; your menu may differ. Some examples for different phones:

Samsung Galaxy S22+
The following example is from a Samsung Galaxy S22+:
Please be considerate of nearby patrons when using live captioning:
Set your screen to dark mode by selecting iOS:
Settings > Display & Brightness > Dark
Android: Settings > Display > Dark
On the same settings screen, make your screen brightness as low as possible
Keep your device directly in front of you and as close to your lap as possible
If necessary, consider increasing distance readability by increasing the text size and/or turning on Bold Text (on the same Display settings page)
If you’re concerned patrons sitting near you are being distracted by your device, consider moving to the back row of the theater or ask an usher if you can use one of the “usher seats” on the back wall of the theater
For additional questions, see a Wilson Center usher, house manager, or technical staff.